Table of Contents
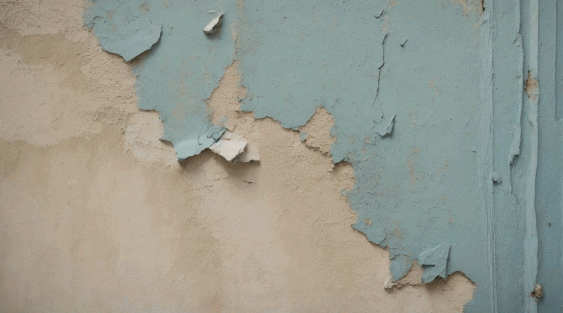
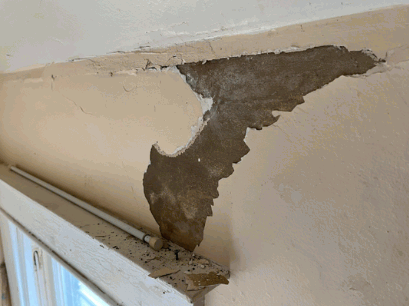
Peeling paint on plaster walls can be a frustrating issue for homeowners. Whether it’s caused by moisture and humidity, poor adhesion, or simply the natural wear and tear of time, the result is the same – unsightly patches of flaking paint that detract from the aesthetic appeal of your home.
In this comprehensive guide, we will delve into the causes of peeling paint on plaster walls and provide a step-by-step approach to preparing for and executing repairs. From gathering the necessary supplies to properly priming and painting the wall, we will walk you through the entire process. We’ll explore preventative measures to help you avoid future peeling paint issues. If you’re ready to restore the beauty of your plaster walls and ensure long-lasting results, read on to discover expert tips and techniques for repairing and preventing peeling paint.
What Causes Peeling Paint On Plaster Walls?
Peeling paint on plaster walls can be caused by various factors, including moisture and humidity, poor adhesion, and the natural aging and wear of the walls.
Excessive moisture in the walls can lead to the breakdown of the paint film, causing it to lose its adhesive properties. Poor adhesion during the initial painting process or a lack of proper surface preparation can contribute to peeling.
Over time, as plaster walls age and experience wear, the paint may begin to crack and peel, especially in high-traffic areas. Understanding these causes is crucial for implementing effective DIY repair techniques, such as proper priming, sanding, and using quality paint products to prevent peeling in the future.
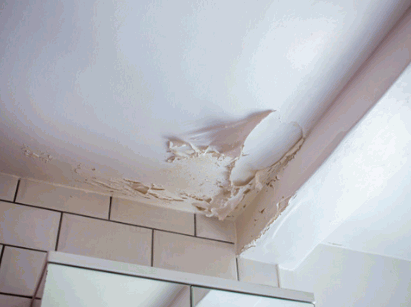
Moisture And Humidity
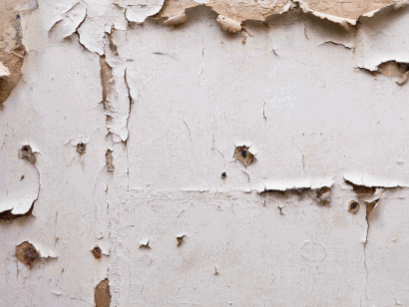
Peeling paint on plaster walls due to moisture and humidity is a common issue, often aggravated by water damage and the lack of a proper moisture barrier.
This deterioration can lead to unsightly blemishes and compromised integrity in the walls. Water damage can weaken the plaster, causing it to crumble and creating a breeding ground for mold and mildew. Repairing water-damaged plaster walls is a labor-intensive and costly process, often involving the removal of damaged areas and replacement with new plaster.
Preventative measures, such as applying a moisture barrier during construction or renovation, are crucial to safeguarding plaster walls from the harmful effects of moisture and humidity.
Poor Adhesion
Poor adhesion of paint to plaster walls can lead to peeling, especially when using incompatible paint types or in the presence of surface damage.
This lack of adhesion can result in the unsightly appearance of peeling and flaking paint, ultimately leading to the need for repairs to restore the wall’s aesthetics. Latex and acrylic paints, if not correctly adhered, are particularly prone to this issue, especially on plaster surfaces.
In addition to the visual impact, poor adhesion can also lead to functional problems, such as reduced protective capabilities against moisture and environmental elements, further compromising the durability of the paint and the underlying surface.
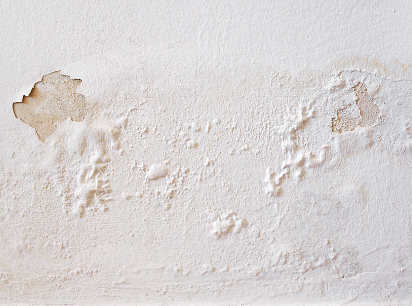
Age And Wear
As plaster walls age, the paint may start peeling due to wear and tear, often manifesting as flaking or cracking in various sections of the walls.
This deterioration occurs gradually over time, as the walls are subjected to environmental factors and natural settling. Common signs of aging plaster walls include the appearance of hairline cracks, crumbling areas, and the emergence of bulging or uneven texture. These issues not only affect the visual appeal of the walls but also indicate structural weaknesses that require prompt attention.
Ignoring these warning signs can lead to further deterioration and potentially costly repairs down the line. It’s important to regularly inspect plaster walls and address any flaking or cracking promptly to maintain the integrity and aesthetics of the interior spaces.
How To Prepare For Repairing Peeling Paint On Plaster Walls?
Preparing for the repair of peeling paint on plaster walls involves gathering the necessary tools and materials, followed by thorough cleaning, scraping off loose paint, and sanding the surface.
This preparation process is essential for ensuring a smooth and long-lasting repair. To begin, gather tools such as paint scrapers, sandpaper, a putty knife, and a dust mask to protect yourself from inhaling paint dust. Gather materials like patching compound, primer, and paint that match the wall’s current color.
Once the supplies are ready, start by cleaning the wall with a solution of mild detergent and water to remove dirt and grime. After cleaning, use a scraper to remove any loose or flaking paint, and then carefully sand the area to create a smooth, even surface for the new paint to adhere to. This thorough preparation will ensure a successful repair and a professional-looking finish.
Gather Supplies
Gathering the necessary supplies for repairing peeling paint on plaster walls includes obtaining tools such as a paintbrush, roller, and primer, along with the required materials for the task.
A good quality paintbrush is essential for applying the primer and paint accurately, ensuring a smooth and even finish. Alongside the brush, a roller can be used to cover larger areas efficiently.
A high-quality primer is necessary to create a stable base for the new paint application. Other relevant supplies, such as masking tape, drop cloths, sandpaper, and a dust mask, should also be procured to ensure a clean and safe repair process.
Clean The Wall
Cleaning the wall surface is crucial in the preparation phase, involving the removal of loose paint by scraping and addressing any visible signs of flaking or surface damage.
This step is fundamental in ensuring a smooth and durable finish for any repair or repainting work. By diligently scraping off loose paint, you create a clean canvas for the application of new layers. Addressing visible signs of flaking and surface damage not only enhances the overall appearance but also prevents further deterioration.
Proper wall cleaning sets the foundation for a successful repair and ensures that the new paint or repair material adheres effectively, resulting in a long-lasting and professional finish.
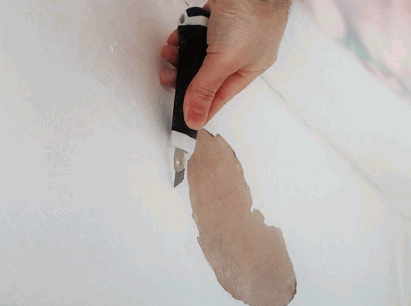
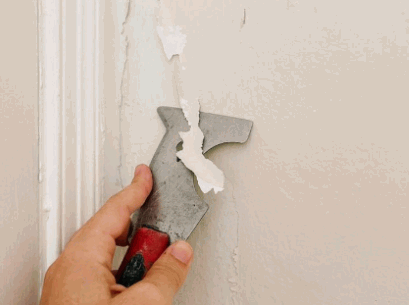
Scrape Off Loose Paint
Scraping off loose paint from the plaster walls is a critical step in the preparation process, ensuring a clean and smooth surface for the subsequent repair work.
This technique involves using a scraping tool to carefully remove any peeling or flaking paint, as these imperfections can interfere with the adhesion of new paint or surface repairs. By thoroughly scraping away the loose paint, you create a sound foundation for the repair materials to bond effectively with the surface. This process also aids in uncovering any underlying damage or irregularities that may need to be addressed before proceeding with the repair, ensuring a professional and long-lasting finish.
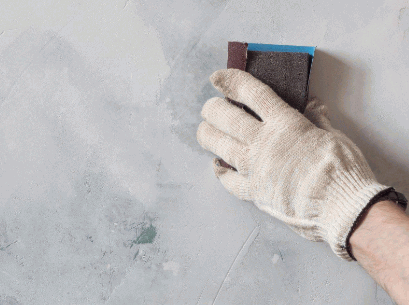
Sand The Surface
Sanding the surface of the plaster walls helps create a smooth and even base, essential for the subsequent repair and painting processes.
This preparatory step ensures that any imperfections or rough areas on the wall surface are smoothed out, allowing for a flawless application of repair materials and paint. By carefully sanding the walls, you are also removing any old paint or residue, ensuring that the new layers adhere properly.
This attention to detail in the preparation phase sets the stage for a high-quality finish, making the repair work durable and the paint application uniform and long-lasting.
What Are The Steps To Repair Peeling Paint On Plaster Walls?
Repairing peeling paint on plaster walls involves a series of steps, including surface priming, patching holes, applying joint compound, sanding, and finally, priming and painting the walls.
These steps need to be carried out meticulously to achieve a smooth and flawless finish.
- First, the surface should be properly cleaned and primed to ensure proper adhesion of the new paint.
- Next, any holes or cracks in the plaster should be patched using a suitable filler.
- After this, a joint compound is applied to smooth out any imperfections and create a seamless surface.
- Once dried, the walls are sanded to remove any uneven areas and create a smooth base for the new paint.
- The walls are primed and painted to give them a fresh, new look.
Prime The Surface
The first step in the repair process is to prime the surface to ensure proper adhesion of the new paint, often involving the use of a suitable sealant for added protection.
This preparation step is crucial as it creates a smooth, clean surface for the paint to adhere to, preventing peeling or flaking in the future. Properly priming the surface also helps to achieve a more uniform finish and better color retention. Applying a sealant can further protect the repaired area from moisture and other environmental factors, prolonging the longevity of the repair.
The priming and sealing process is essential for a successful and durable repair job.
Delve into: What Is Lime Plastering
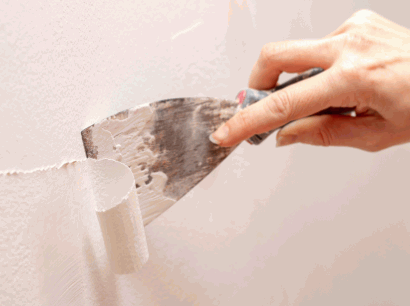
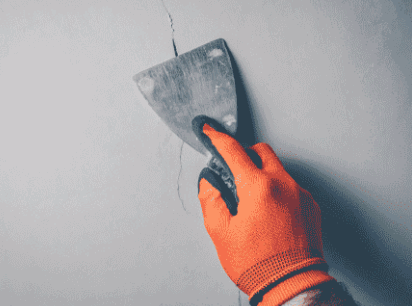
Patch Any Holes Or Cracks
Addressing any existing holes or cracks on the plaster walls is crucial, typically involving the application of a repair compound to ensure a smooth and even surface.
This repair compound is specially formulated to easily fill in these imperfections, providing a seamless finish. First, it’s essential to clean the area around the holes or cracks to ensure proper adhesion. Once the surface is prepared, apply the repair compound generously, using a putty knife to spread it evenly and fill the cavities. After allowing sufficient drying time, sand the patched areas to achieve a uniform texture. This process not only restores the wall’s integrity but also ensures a flawless appearance.
Apply Joint Compound
Applying a joint compound to the repaired areas helps in smoothing out imperfections and preparing the surface for the subsequent priming and painting processes.
This crucial application of joint compound fills in any gaps or cracks left after the repair, ensuring a seamless and uniform surface. The proper application involves using a putty knife to spread the compound evenly and feathering the edges for a seamless blend with the surrounding surface.
The smoothed and leveled surface achieved through this process provides a solid foundation for the primer and paint to adhere to, resulting in a flawless finish.

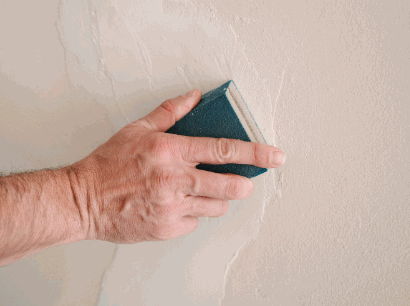
Sand And Smooth The Surface
Sanding and smoothing the surface after the application of the joint compound ensures a seamless and uniform base for the final priming and painting stages of the repair process.
This critical step not only creates a flawless canvas for paint application but also eliminates any imperfections, such as ridges or uneven textures, that may be left behind after the joint compound is applied. By carefully sanding and smoothing the surface, the resulting finish will be professional in appearance and durable in its adherence. It aids in achieving a consistent and polished look, ultimately enhancing the overall aesthetic appeal of the painted surface.
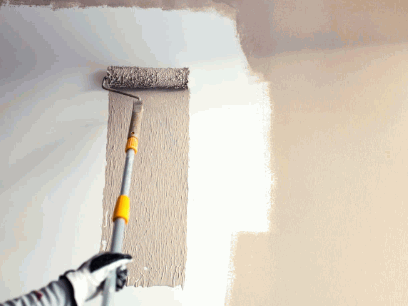
Prime And Paint The Wall
The final steps involve priming and painting the repaired wall surface, necessitating the use of appropriate protective gear and ensuring a thorough and even application of the paint.
The priming stage is crucial as it creates a smooth surface for the paint to adhere to. It’s important to choose a high-quality primer suitable for the wall material. Once the primer is applied and dried, carefully select the right paint color and type for a flawless finish. It’s vital to don protective gear such as gloves, goggles, and a mask to safeguard against fumes and potential splatters. Ensure a well-ventilated area for the painting process to achieve optimal results.
How To Prevent Peeling Paint On Plaster Walls?
Preventing peeling paint on plaster walls involves addressing water leaks, using high-quality paint and primer, ensuring proper surface preparation, and maintaining good ventilation and humidity levels.
This can be achieved by routinely inspecting the walls for any signs of water infiltration and promptly taking measures to repair any leaks. When applying the paint, it is vital to invest in high-quality products that are specifically formulated for plaster surfaces to ensure better adhesion and durability.
Thorough cleaning and sanding of the walls before painting can significantly improve the paint’s bond with the surface. Adequate ventilation and controlling humidity levels in the room can help prevent moisture-related issues that contribute to paint peeling.
Fix Any Water Leaks
Addressing and fixing any water leaks is crucial in preventing peeling paint on plaster walls, often involving the use of moisture-resistant paint for added protection.
Water leaks can cause serious damage if left unattended, leading to mold growth, structural deterioration, and costly repairs. By conducting regular maintenance to identify and address leaks promptly, homeowners can preserve the integrity of their walls and prevent further damage.
Applying moisture-resistant paint can provide an extra layer of protection, creating a barrier against moisture infiltration and reducing the risk of peeling and discoloration.

Use High-Quality Paint And Primer
Utilizing high-quality paint and primer is essential for preventing peeling on plaster walls, ensuring proper adhesion and long-term durability of the painted surface.
Using high-quality paint and primer not only enhances the aesthetic appeal of the walls but also contributes to their structural integrity. Proper adhesion of the paint to the surface is crucial for protecting the walls from moisture, mildew, and other environmental factors. A high-quality primer ensures that any repairs or imperfections on the plaster walls are adequately covered, resulting in a smooth and flawless finish. Investing in these quality products can significantly extend the lifespan of the paint job and reduce the need for frequent touch-ups or repainting.
Properly Prepare The Surface Before Painting
Thoroughly preparing the wall surface before painting is crucial for preventing peeling, involving proper cleaning, and addressing any imperfections or damage prior to the application of paint.
This preparation process ensures that the paint adheres effectively to the surface, promoting longevity and a professional finish. Proper cleaning removes dirt, grease, and other contaminants that can hinder paint adhesion while addressing imperfections such as cracks or holes ensuring a smooth and even application. Repairing any damage, such as flaking paint or water stains, before painting can prevent further deterioration and maintain the integrity of the surface. Ultimately, investing time in thorough surface preparation can significantly enhance the durability and aesthetic appeal of the painted surface.
Maintain Good Ventilation And Humidity Levels
Maintaining good ventilation and controlling humidity levels is essential for preventing moisture-related peeling on plaster walls, contributing to the long-term protection of the painted surface.
Proper ventilation ensures that excess moisture doesn’t accumulate within the walls, reducing the likelihood of peeling paint and the need for costly repair. In addition, maintaining optimal humidity levels helps to preserve the integrity of the paint, preventing it from bubbling or flaking. By paying attention to these factors, homeowners can effectively protect their walls and prolong the lifespan of the paint, ultimately reducing the frequency of maintenance and repair required.